Loading...
Loading...
Loading...
Loading...
Loading...
Loading...
Loading...
Loading...
Loading...
Loading...
Loading...
Loading...
Loading...
A step by step guide to buy a number from Retell
This guide will walk through how to purchase a number from Retell. The numbers are managed by Retell, so you don’t have to worry about the telephony infrastructure.
Currently we only support purchase of US numbers and only support making domestic calls from the platform. If you are looking to use numbers from other countries, or to make international calls, or to use your own telephony provider, check out Custom Telephony guide.
You can purchase and bind agents to the number from the dashboard. You can optionally specify the area codes you want to purchase from.
After the number is purchased, you can change its nickname so that it’s easier for you to find and identify.
At this stage, the number should already be ready to accept inbound calls if you have assigned an inbound agent. Give it a try by calling it!
Check out for all the parameters you can use programmatically.
Phone numbers are yours once purchased, and can be used indefinitely. Find numbers you own .
You can assign different inbound and outbound agent to the number.
If you don’t want user to be able to call this number (maybe you are doing outbound and don’t want callbacks), you can leave inbound_agent_id unset.
NodePython
Numbers are charged at $2 per month.
const phoneNumberResponse = await retell.phoneNumber.create({
  inbound_agent_id: "oBeDLoLOeuAbiuaMFXRtDOLriTJ5tSxD", // replace with the agent id you want to assign
  outbound_agent_id: "oBeDLoLOeuAbiuaMFXRtDOLriTJ5tSxD", // replace with the agent id you want to assign
});

console.log(phoneNumberResponse);Configure your AI agent to detect and handle voicemails automatically
It is common that your phone agent will encounter voicemails. You can configure your agent to either hang up or leave a message when it detects a voicemail.
The system internally run voicemail detection continuously (within the timeout), and if you select to hang up in voicemail, we will do that the moment we detect we are in voicemail. If you select to leave a message, the system will wait for its turn to speak to leave that message. If the voicemail detection timeout is reached, the system will stop the voicemail detection, and will continue with the call as normal.
1
Enable Voicemail Detection
Navigate to your agent settings and enable “Voicemail Detection”
2
Choose Voicemail Behavior
Select one of two options:
Hang up: The agent will disconnect when it detects a voicemail
Leave a message: The agent will play a pre-recorded message after it’s agent’s turn to speak
3
Configure Detection Duration
Set the “Voicemail Detection Duration” timeout. This is the time where you will have the voicemail detection to be active for after the call is connected. With more minutes into the call, the chance you hit a voicemail is lower and you might want to turn the voicemail detection off to avoid false positives, and that’s why there’s a timeout setting here. This timeout will not cause your agent’s voicemail message to be cut off.
We recommend starting with 30 seconds, and extend this time if you reach voicemail in a later time in the call or the recorded message in that voicemail is long.
4
Set Voicemail Message (Optional)
If you selected “Leave a message” in Step 2: Enter the message you want the agent to leave. You can either set a prompt so that the message will be generated dynamically, or you can set a fixed static message.
In real-world scenarios, phone calls often face audio quality challenges such as background noise, echo, or other unwanted sounds.
While our orchestration model is designed to handle background noise effectively, you may want to fine-tune the settings for optimal performance in challenging environments.
1
Adjust the responsiveness
Navigate to your agent’s settings
Set the “Responsiveness” setting to 0.9
This adjustment makes the agent more deliberate in its responses, reducing false triggers from background noise.
2
Configure the interruption sensitivity
In the same settings panel
Set the “Interruption Sensitivity” to 0.8
This setting helps the agent distinguish between intentional speech and background interference
For extremely noisy environments like construction sites or busy streets, you may need to experiment with even higher settings.
Conversation flow agent allows you to create multiple nodes to handle different scenarios in the conversation. It provides more fine-grained control over the conversation flow compared to single / multi prompt agent, which unlocks the ability to handle more complex scenarios.
Global Settings: Global settings are settings that apply to the entire conversation. For example, you can set the global prompt, default voice, language, and other agent related settings here.
Node: A node is a basic unit of conversation flow. There’s multiple types of nodes. A node can define how to interact with user, how to make function calls, and many other settings.
Edge: An edge is a connection between two nodes. It defines the conditions for transitioning from one node to another.
Functions: Define functions used by this agent, and select them in individual function nodes.
Every node defines a small set of logic, and the transition condition is used to determine which node to transition to. Once the condition is met when checked, the agent will transition to the next node. There are also finetune examples on nodes that can help you further improve the performance. It might take longer to set up, as you want to cover all the scenarios, but after that it’s much easier to maintain and the performance is more stable and predictable.
Head to the Dashboard, create a new conversation flow agent and select a pre-built template to get started. You can view all options available to the agent within the Dashboard, with details of the options and any lantency implications listed there. You can also view the estimated latency and cost of the agent. Modify the template to your needs, all changes are auto saved.
Since the choice of model can be overriden within individual nodes, the pricing for each call is calculated based on how many seconds spent within each node * the model price per second for that node, and aggregated across all nodes.
Deploy your first phone agent in 5 minutes.
Retell is a platform for building, testing, deploying, and monitoring reliable AI phone agents that can handle natural conversations over the phone.
1
Create Your Account
Visit the Retell Dashboard
Sign up for a new account
2
Create a New Agent
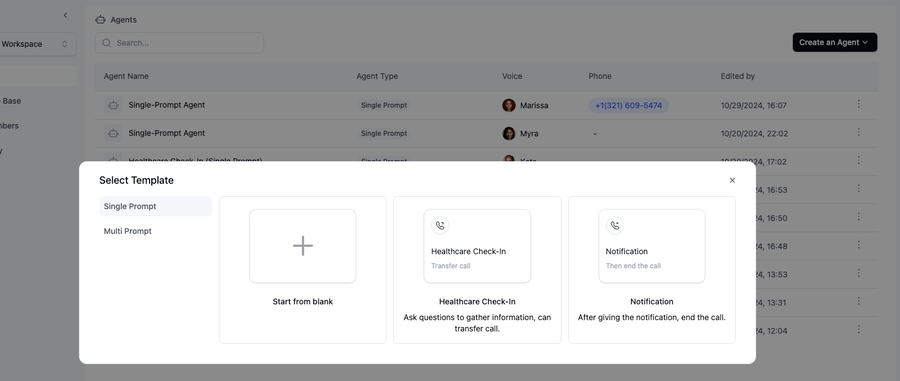
Navigate to the “Agents” tab
Click “Create an agent”
Choose a template
If you are not sure which template to choose, we recommend starting with “Lead qualification” in “Multi Prompt” category.
3
Test Your Agent
Click the “Test” button to test your agent
4
Add your payment method
Before buying a phone number, you need to add a payment method to your account
Go to the “Billing” tab and click “Change payment methods”
5
Deploy to a Phone Number
Go to the “Phone Numbers” tab
Click “Buy New Number”
(Optional) Enter the area code you want to buy the number for
Purchase your number
6
Test Your Phone Agent
Incoming Calls:
Dial your purchased number
Outbound Calls:
Click “Make an outbound call”
🎉 Congratulations! Your agent is now live and can:
Receive incoming calls
Make outbound calls
Handle natural conversations
Process requests 24/7
Enter the phone number including the country code (e.g., +12137774445)
Testing is essential for successfully deploying your agent to production. Follow these recommended steps to ensure a robust deployment:
Validate and refine your agent’s behavior:
Use the LLM Playground to test conversation flows and responses
Use
Ensure accurate function calling and conversation handling
Test your agent in phone environments:
Place test calls to your agent
Initiate outbound calls from your agent
Validate performance with background noise and user interruptions
Perform controlled testing in production:
Deploy with a small sample size (5-10 calls)
Use to track performance
Measure critical metrics including completion rates and user satisfaction
Scale your deployment strategically:
Incrementally expand your user base
Maintain continuous performance monitoring
In this guide, we will show how to integrate Retell agents with your telephony providers and use your numbers. Please note that this is independent of the agent type you are using.
We will provide two ways to integrate with your telephony provider:
Elastic SIP trunking: This is the recommended way to integrate with your telephony provider that supports elastic SIP trunking. You will need to set up a SIP trunking and configure your number to point to it, and then import that number to Retell.
Dial to SIP Endpoint: If your telephony provider does not support elastic SIP trunking, or you have more complicated telephony setup that cannot use elastic SIP trunking, you can dial the call to a specific SIP endpoint.
Retell SIP server uri: sip:5t4n6j0wnrl.sip.livekit.cloud
If inbound does not work (might be due to initial SDP being dropped), specify to use TCP as the transport protocol: sip:5t4n6j0wnrl.sip.livekit.cloud;transport=tcp
We currently do not provide a static IP address for the SIP server, as it’s deployed globally across different cloud.
Elastic SIP Trunking is a service offered by cloud communications platforms that enables organizations to connect their existing PBX (Private Branch Exchange) or VoIP (Voice over IP) infrastructure to the Public Switched Telephone Network (PSTN) over the internet using the SIP (Session Initiation Protocol).
In this context, the elastic SIP trunking is used to connect Retell’s VoIP with PSTN so that your agents can make and receive calls. When using this method, all the telephony functionalities that are supported by Retell numbers will also be supported here, assuming that your telephony provider supports it.
SIP trunking is a popular service offered by many telephony providers, so most likely your telephony provider would be able to support this.
Here’re detailed guides for some telephony providers:
If you are using a telephony provider that requires static IP address, or you are having trouble setting up, you can check out our partner , where you can connect to Jambonz’s system that already connects with Retell (which supports static IP address) and use their SIP trunking service. Dedicated slack support channel is available for Retell users.
If your telephony provider does not support elastic SIP trunking, or you have more complicated telephony setup that cannot use elastic SIP trunking, you can use this method.
When using this method, Retell does not directly make or receive calls, but instead relies on your system to dial the call to the respective SIP endpoint. This would require you to have some codes to handle integration with your telephony provider. All traffic looks like inbound to Retell in this case, so it’s up to you to specify the call direction.
When using this method, you will not be able to utilize Retell’s transfer call feature, as we do not have information about the underlying telephony provider and number.
Here we assume you already have your call handling setup. For Retell to know what agent to use to handle the call, and for you to obtain SIP endpoint to use for this call, you would call the . You will get a call_id back from this API, and you would use it to piece together the SIP endpoint.
SIP endpoint: sip:{call_id}@5t4n6j0wnrl.sip.livekit.cloud
Here’s an overly simplified example code to handle the inbound call webhook from Twilio and dialing the call to the SIP endpoint.
Node
const client = new Retell({
  apiKey: 'YOUR_RETELL_API_KEY',
});

server.app.post(
  "/voice-webhook",
  async (req: Request, res: Response) => {
    // Register the phone call to get call id
    const phoneCallResponse = await client.call.registerPhoneCall({
      agent_id: 'oBeDLoLOeuAbiuaMFXRtDOLriTJ5tSxD',
      from_number: "+12137771234", // optional
      to_number: "+12137771235", // optional
      direction: "inbound", // optional
    });

    // Start phone call websocket
    const voiceResponse = new VoiceResponse();
    const dial = voiceResponse.dial();
    dial.sip(
      `sip:${phoneCallResponse.call_id}@5t4n6j0wnrl.sip.livekit.cloud`,
    );
    res.set("Content-Type", "text/xml");
    res.send(voiceResponse.toString());
  },
);Learn how to use Retell’s Node.js and Python SDKs
While you can use our REST API for most operations, we recommend using our SDKs to speed up development and reduce code complexity. Our SDKs provide typed methods and a more structured approach to integrating with Retell.
Node.js TypeScript SDK
Requires Node.js version 18.10.0 or higher
Python SDK
Requires Python 3.x
1
Get Your API Key
Navigate to the “API Keys” tab in your dashboard to obtain your API key.
2
Install the SDK
Choose your preferred language and install the SDK:
Node ClientPython Client
3
Initialize the Client
Create a new client instance using your API key:
Node ClientPython Client
4
Make API Calls
Here’s an example of making a phone call using the SDK:
Node ClientPython Client
To illustrate the benefits of using our SDK, here’s a comparison of creating an agent using both methods:
Using REST API (More Verbose)
Using SDK (More Concise)
Error Handling: Always wrap SDK calls in try-catch blocks
Type Safety: Take advantage of TypeScript types in the Node.js SDK
API Reference: Refer to our for all available parameters
Find more SDK examples in our test suites to learn more about how to use the SDK:
npm i retell-sdkimport Retell from 'retell-sdk';
const retellClient = new Retell({
apiKey: "YOUR_API_KEY",
});try {
const response = await retellClient.call.createPhoneCall({
from_number: '+14157774444',
to_number: '+12137774445',
});
console.log('Call initiated:', response);
} catch (error) {
console.error('Error making call:', error);
}const options = {
method: 'POST',
headers: {
Authorization: '<authorization>',
'Content-Type': 'application/json'
},
body: JSON.stringify({
response_engine: {
type: 'retell-llm',
llm_id: 'llm_234sdertfsdsfsdf'
},
agent_name: 'Jarvis',
voice_id: '11labs-Adrian',
// ... many more configuration options
})
};
fetch('https://api.retellai.com/create-agent', options)
.then(response => response.json())
.then(response => console.log(response))
.catch(err => console.error(err));import Retell from 'retell-sdk';
const client = new Retell({
apiKey: 'YOUR_RETELL_API_KEY',
});
async function main() {
const params: Retell.AgentCreateParams = {
response_engine: {
llm_id: 'llm_234sdertfsdsfsdf',
type: 'retell-llm'
},
voice_id: '11labs-Adrian',
};
const agentResponse = await client.agent.create(params);
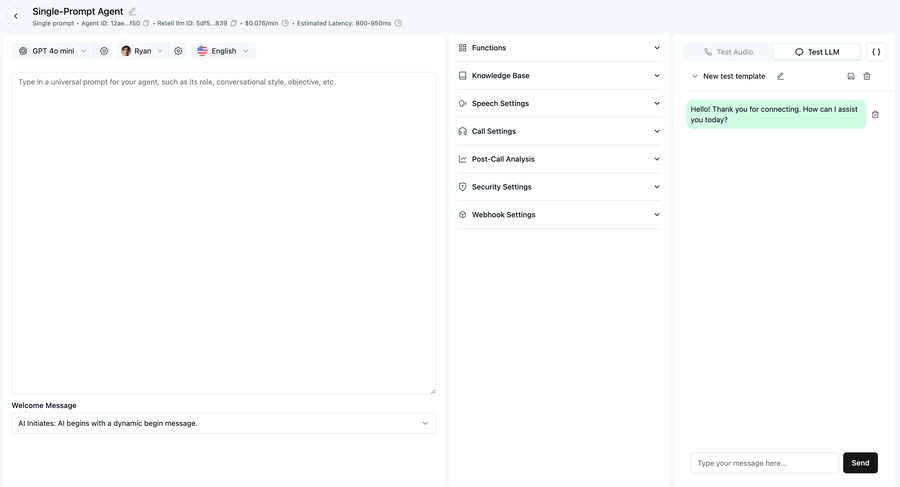
}Learn how to effectively test and debug your AI agents using the LLM Playground
The LLM Playground provides a convenient environment for testing your AI agents without making actual web or phone calls. This interactive testing interface enables:
Rapid prototyping and debugging of agent responses
Testing different conversation scenarios
Immediate feedback on agent behavior
Faster development iterations
1
Access the LLM Playground
Navigate to your agent’s detail page
Click on the “Test LLM” tab
You’ll see the chat interface where you can start testing
LLM Playground Interface
2
Test Basic Conversations
Type your message in the input field
Observe the agent’s response
3
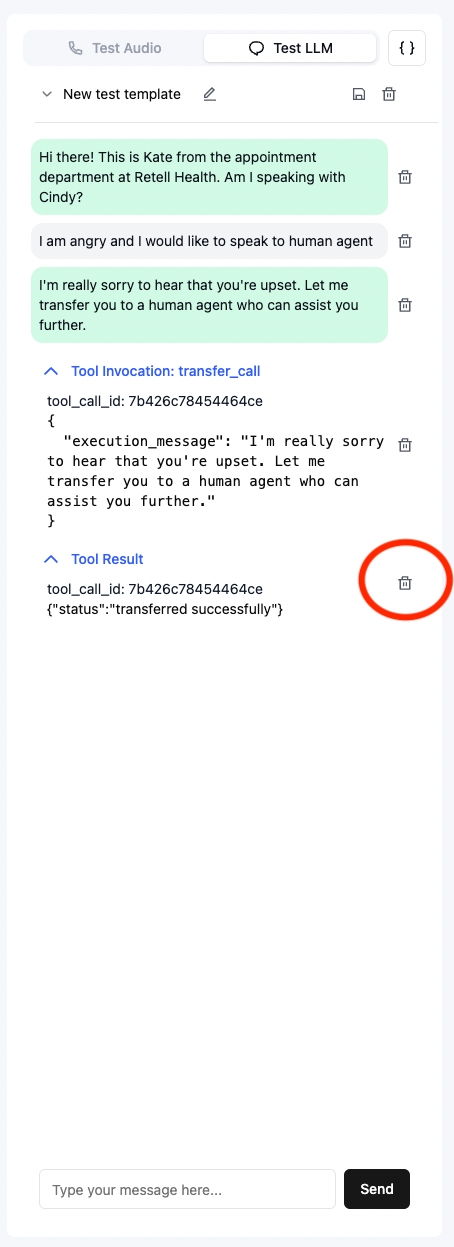
Test Function Calling
Use prompts that should trigger specific functions
Verify that functions are called with correct parameters
4
Iterate and Refine
Monitor agent behavior and responses
Update prompts or functions as needed
Click the “delete” button to reset conversations
Test the updated behavior
Iterate and test
5
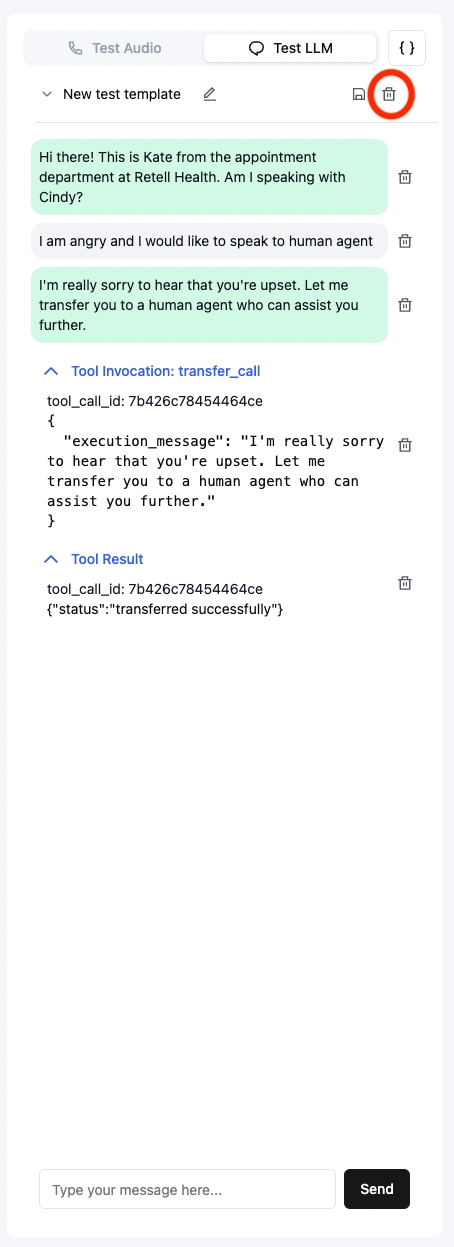
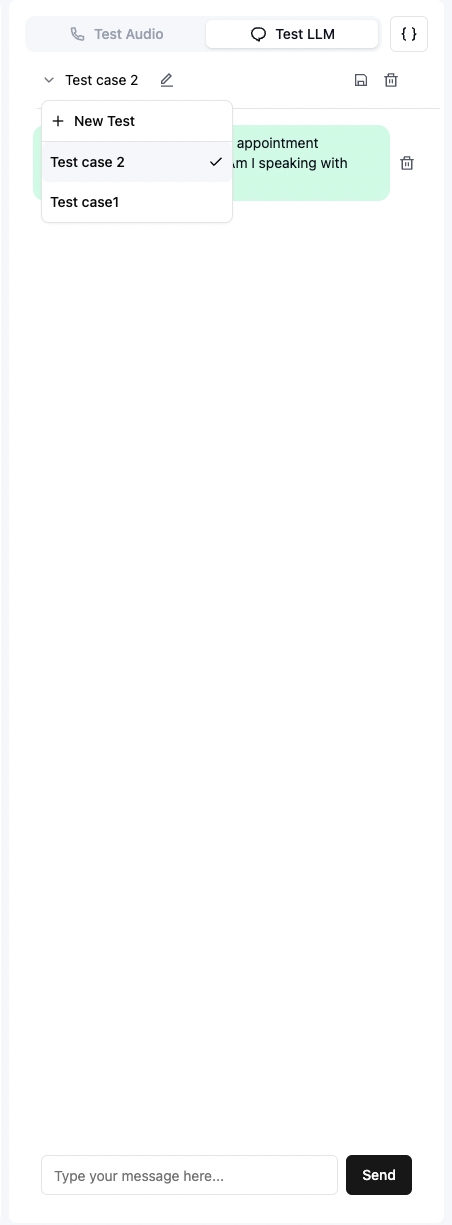
Save Test Cases
Click the “Save” button to store your test conversation
Add a descriptive name for the test case
Access saved tests from the agent detail page
Save test case
Saved test cases
6
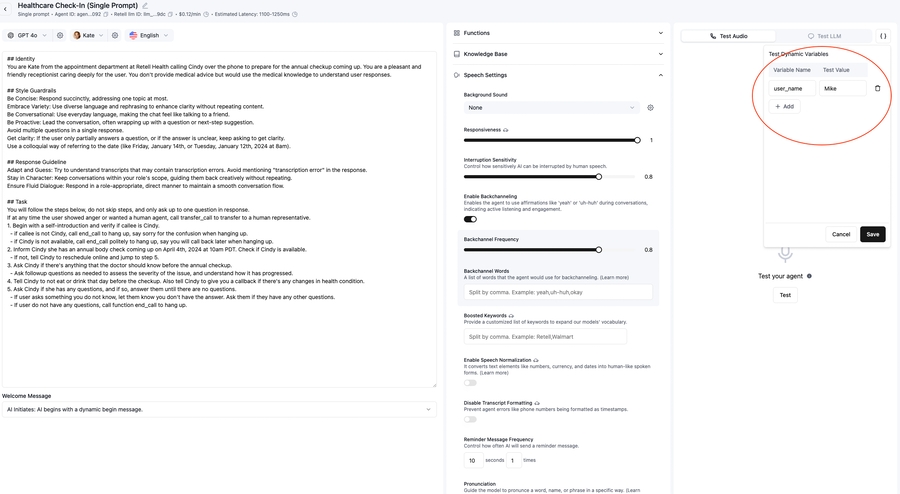
Test Dynamic Variables
Use dynamic variables in your prompts
Verify that variables are properly interpolated
Test different variable values and scenarios
Start with simple conversations and gradually test more complex scenarios
Save important test cases for regression testing
Test edge cases and error handling
Document unexpected behaviors for future reference
A step by step guide to make & receive phone calls with Retell managed numbers & imported numbers
From previous guides, you already have numbers purchased or imported. This guide will walk through how to assign agents, and make and receive phone calls.
Only when you bind agents to a number will the number be able to receive and make calls.
You can assign different inbound and outbound agent to the number.
You can leave agent unset to disable inbound / outbound (for example, you are doing outbound and don’t want callbacks, you can leave inbound_agent_id unset)
After binding an agent for inbound, you should be able to receive inbound calls already.
If you are using a number purchased from Retell, right now it’s not able to make international calls. This restriction does not apply to imported numbers, as you have to set geo location permissions yourself at your telephony provider.
Check out for all the parameters you can use.
from_number is the e.164 string format of the number you purchased earlier.
to_number is the phone number you want to call in e.164 string format.
NodePython
Check out for all the parameters you can use to update the inbound and outbound agent who handles the phone. You can also turn off the inbound calls for the number by setting inbound_agent_id to null.
API: You can use to get information like transcript, recording, latency tracking, etc.
Webhook: You can also setup webhooks to receive real time updates when call is initiated, ends, and analyzed. Read more at .

const registerCallResponse = await retell.call.createPhoneCall({
  from_number: '+14157774444', // replace with the number you purchased
  to_number: '+12137774445',  // replace with the number you want to call
});
console.log(registerCallResponse);
Understand the constraints and limitations of the agents.
We have enforced some constraints and limitations to ensure the smooth operation of your agents, and prevent any misuse of the service. Note that these constraints can be adjusted based on your operational needs, on a case-by-case basis.
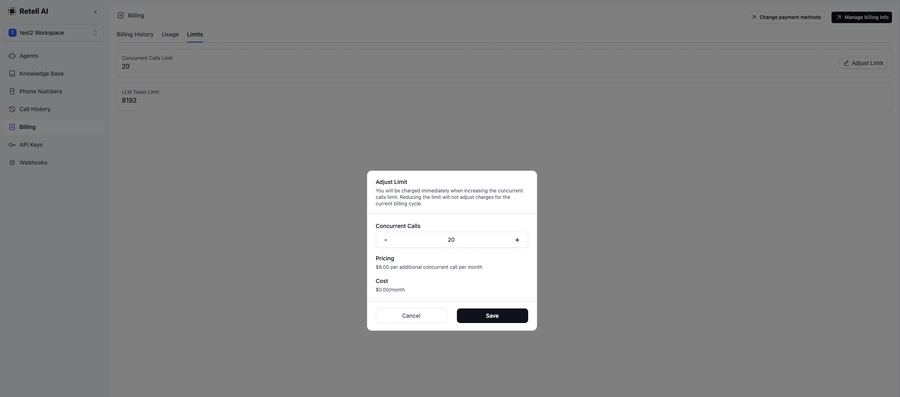
As part of our service, Pay-As-You-Go users are allocated a quota of 20 concurrent calls. Should your operational needs require additional concurrency, you can go to “Billing” page to upgrade your plan.
Billing Page
You can check your current number of concurrent calls in the dashboard.
Handling Multiple Calls per Agent: You don’t need to create multiple agents to manage multiple calls concurrently. Each agent within your plan is capable of handling an unlimited number of calls, provided that the total concurrency remains within your designated quota. This means you can efficiently manage your workload without unnecessary agent duplication.
The maximum duration of a call is 1 hours by default, and the call will end automatically after 1 hour. Should your operational needs require longer calls, please reach out to our team at to discuss options.
The maximum length of prompt when using Retell LLM framework is 8192 by default, and longer prompt will be rejected when creating or updating the LLM. Should your operational needs require longer context, please reach out to our team at to discuss options.


A step by step guide to create a web call with agent using frontend Web SDK
Step 1: Install the Retell Web SDK
npm install retell-client-js-sdk
Step 2: Set up the SDK class
create-web-call to get call idYour client code should call your server endpoint which internally calls to get the access token for the call. The endpoint requires using your Retell API Key, which is the reason why you need to call the endpoint from the server instead of client to protect the key from exposing.
The access token obtained will be used in your frontend client code to start the call.
Note that if you do not start the call within 30s obtaining the access token, we will invalidate it and the call will be marked with error.
Once call starts, you can listen to a couple events that’s emitted for real time updates about the call.
There are other optional options that allow you to set the sample rate of call, audio capture and playback device, whether to receive raw audio bytes from the client.
You can close a web call with the agent by using
You can listen to events emitted by the SDK to get real time updates about the call, including who is speaking, the real time transcript, start and end of the call.
If you have not worked with audio bytes before, we stronly suggest you to check out , which can help with choosing the best configuration here.
PCM audio format conversion functions convertUnsigned8ToFloat32 and convertFloat32ToUnsigned8 can be found in .
import { RetellWebClient } from "retell-client-js-sdk";

const retellWebClient = new RetellWebClient();await retellWebClient.startCall({
accessToken: createCallResponse.access_token,
});await retellWebClient.startCall({
accessToken: createCallResponse.access_token,
sampleRate: 24000, // (Optional) set sample rate of the audio capture and playback
// (Optional) device id of the mic.
captureDeviceId: "default",
// (Optional) device id of the speaker
playbackDeviceId:
"0ec1807fd0fe6e51b990660ec4e2ebb78sdfcba51e279815d00c423ce03407ff",
// (Optional) Whether to emit "audio" events that contain raw pcm audio bytes represented by Float32Array
emitRawAudioSamples: false,
});retellWebClient.stopCall();retellWebClient.on("call_started", () => {
console.log("call started");
});
retellWebClient.on("call_ended", () => {
console.log("call ended");
setIsCallActive(false);
});
// When agent starts talking for the utterance
// useful for animation
retellWebClient.on("agent_start_talking", () => {
console.log("agent_start_talking");
});
// When agent is done talking for the utterance
// useful for animation
retellWebClient.on("agent_stop_talking", () => {
console.log("agent_stop_talking");
});
// Real time pcm audio bytes being played back, in format of Float32Array
// only available when emitRawAudioSamples is true
retellWebClient.on("audio", (audio) => {
// console.log(audio);
});
// Update message such as transcript
// You can get transcrit with update.transcript
// Please note that transcript only contains last 5 sentences to avoid the payload being too large
retellWebClient.on("update", (update) => {
// console.log(update);
});
retellWebClient.on("metadata", (metadata) => {
// console.log(metadata);
});
retellWebClient.on("error", (error) => {
console.error("An error occurred:", error);
// Stop the call
retellWebClient.stopCall();
});